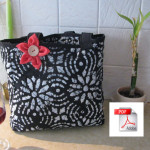
 Finally, here is your chance to make the ultimate weekend bag yourself in the exact colors you want, at your own leisure. This guide contains actual photos, clear descriptions and simple steps to enable you to create this bag with your own signature.
This lovely, handmade, multi-purpose small tote is a great gift idea. It’s handy for taking a few items and still looking fashionable without being loaded down. Tissues, keys, sunglasses and a book. What more do you need?
The dimensions of the finished bag are: 9″ back/front x 2.75″ side panel x 10″ long; 9.5″ handle drop (can be a short shoulder bag or hand-held)
23.5cm back/front x 7cm side panel x 25cm long; 24cm handle drop
The design includes straps that are filled with batting for added comfort. The bag has a cute flower that adds to its beauty.
http://www.etsy.com/listing/78173639/pdf-tutorial-how-to-make-a-quilted
I will email a PDF file of this tutorial upon receipt of your email address and payment. No shipment costs; no waiting!
*** Update***
I have also decided to provide this bag as a combination tutorial / fabric kit in case you don’t have time to shop for fabric. So, visit this second shop item if you prefer having the fabric provided!
http://www.etsy.com/listing/78660521/fabric-kit-tutorial-to-make-a-quilted
************
Required materials for this Tote Bag
Body of bag: ½ yard pre-quilted fabric or a pieced or plain top fabric with cotton batting and a back that you have quilted together measuring ½ yard
Coordinating cotton thread
Binding and Straps: ¼ yard coordinating cotton fabric
Straps: 1” strip of batting cut into two pieces measuring 1” x 22”
1 fat quarter lightweight cotton or rayon fabric for the flower
Strong thread, such as a coated cotton or a polyester for hand sewing the flower
1 button
Sewing machine
Walking foot (optional but recommended)
Overlock foot (optional but recommended)
Scissors
Rotary board, ruler and cutter (optional)
Iron
Pins
Hand sewing needle
Note to my fellow Etsy sellers: You are welcome to sell your finished bag but please limit the numbers so we can all benefit…
Please protect artistic works from misuse and illegal infringement by respecting the copyright laws connected with this original tutorial. All the images and instructional information contained in this tutorial belong solely to CindyRQuilts.
Thanks for visiting.
Enjoy!

No Comments